2009 május: Melléktermékek
2008 november: GIMPressziók
2008 június: Stilizált arcok
2008 április: Leképezések
2008 február: Üvegvilág
2007 október vége: Vendég és látója
2007 október vége: Vendégművész 2.
2007 október eleje: Vendégművész 1.
2007 október eleje: Kezdetek 2.
2007 szeptember: Kezdetek 1. HozzászólásokTájékoztató a hozzászólási lehetőségekről KapcsolatÜzenet, levél, kérdés küldése HonlaptérképA honlap tartalma és szerkezete PihentetőülElmejátékok képre, hangra és billentyűzetre A lap aljáraUgrás a lap aljára Firefoxosok figyelmébeAkiknek nagyítva jelenik meg a honlap
RSS 2.0 értesítő ![]()
Legfrissebb oldalak |
|
 |
Húsvéti GIMP tojás Húsvéti tojások festése egérrel és GIMP rutinokkal. |
 |
Hópehely motívumok Klónozás és alakítás Inkscape szűrőkkel. |
 |
3D oszlop Csavart torony Fantázialények GIMP 2.8 ecsetdinamikával rajzolt oszlopok és fantázialények. |
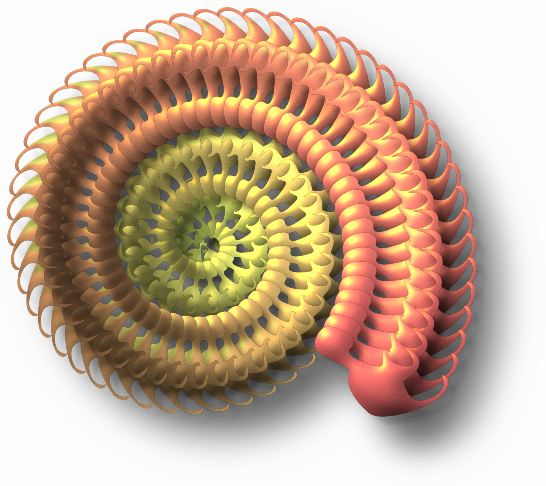 |
Csigaház és társai Alakzatcsoport ráfektetése tetszőleges útvonalra. Inkscape tanulmány és tutorial. |
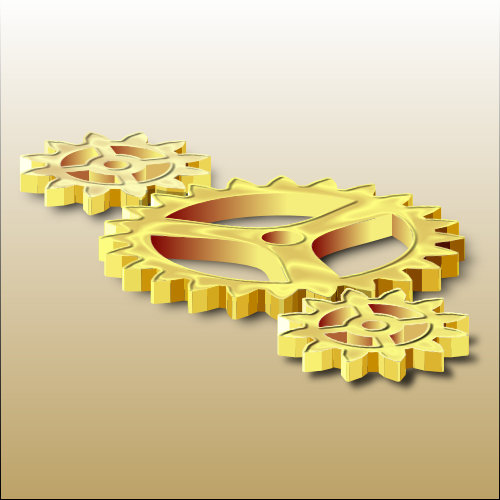 |
3D fogaskerekek Inkscape-pel Az Inkscape "Mozgás" kiterjesztés használatának egyik módja. |
| GIMP 2.6 és 2.8 Néhány gyakorlati szempont a GIMP 2.8 használatával kapcsolatban. |
|
GIMP TUTORIALOK
(A gyűjtőoldalak a linkekre kattintva érhetők el, az egyes tutorialokra pedig onnan lehet továbblapozni. A képekre vagy címekre állva rövid tájékoztató is febukkan.)


KÉPNYELV
A színek hatása 1.A színek hatása 2.
A színek hatása 3.
Vonalak és formák hatása
Művészet vagy iparművészet?
APRÓ TIPPEK KEZDŐKNEK
Hogy(an) ne menjen el...Kinek jó a GIMP?
Nyelvtanulás GIMP-pel (kétnyelvű)
3 tipp abszolút kezdőknek (kétnyelvű)
4 tipp kezdőknek (kétnyelvű)
Hasznos oldalak
Nem a te készülékedben van a hiba
Négy és fél tipp (kétnyelvű)
INKSCAPE TUTORIALOK
Bevezető


A képek a GIMP 2.2.15, 2.4.2, 2.6.4 és 2.8 programmal, illetve Inkscape v0.47.1 programmal készültek a
és az Inkscape.org jóvoltából.

Adatvédelem
Utolsó frissítés: 2014 április
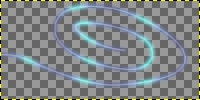
GIF-Movie/Double Spiral — "Layer Shift"
February 2009
Movie size: 73.7 kB Comments at Picasa
This page discusses the production of a 40-frame GIF-movie with GIMP v2.4.2, and with the plug-in GIMP Animation Package (GAP) v2.2.2, compiled by JamesH, who supplied a version that works well. For more information, see Gimptalk.com.
This is an experimental page, the only one speaking in English (so far) on an otherwise Hungarian website.
In GAP v2.2.2 I haven't found a so-called "Layer Shift" feature, by which we can repeat a series of motion within the same image, i.e. we can duplicate a certain group of layers, shift it some frames forward or backward and loop. However, this tutorial will show how to circumvent this problem with some little trick. The tutorial also describes a way of moving a picture and a mask along a path.
The essence of "Layer Shift" method is making an intermediate xcf-"animation" from the half-finished frames and reinserting it in the frames with the "Loop" stepmode, starting from a frame selected at will.
The description does not cover preparation of the source images: everybody can use the images which s/he wants. The tutorial is rather detailed so that GAP-beginners could also make use of it.
Source Images

For the GIF-movie presented we need 4 source images. The first, shown on the far left is spiral_background.xcf, that is a 200x100-pixel image. To its right comes the next one, a blue spiral in a transparent layer fill, named spiral.xcf (200x100px). The third is a 400x200-pixel image, mask.xcf, of which only a small portion is shown here: the white dot in the middle of the otherwise fully black image, and a fourth small, 25x25-pixel transparent image with a white spark in the centre. The final GIF-movie will be of 200x100 px size, so as not to be too bulky. It is recommended to use images with .xcf extension and to store them in the same folder, which we create specifically for this purpose. Currently, the I gave the name "Spiralmovie" to this folder.
As to the source images, it has yet to be mentioned that when you draw the layer used up to simulate a spiral motion (this is the blue spiral image), take into consideration that the longer segment you want to see from the coil, the bigger white mask you should have, therefore, a larger white dot should be placed in the middle of the masking picture. However, if the dot is too large, then not only the current spiral segment will appear in the "animation", but the other arm segment, running parallel to it as well. Therefore, draw the threads of the coil to the longest possible distance from each other. (After drawing any track, e.g. spiral, you may delete path layer from the source image to make things easier later, upon processing the image with GAP.) The size of the white oval shape should be set by some trials.The longer beams can be seen from the spiral without parallel segments, the more spectacular your picture will be.
As to the masking image, place the white dot (that is really a horizontally lying oval shape) exactly in the middle of the image. The oval is completely white in the middle and is blurred at the edges in order to fade progressively the segments of the blue spiral at their two ends. The masking black-and-white image must be at least twice as large as the intended GIF-movie, that means now 400x200 px, so that we could freely move it as a mask without leaving any part of the background uncovered. The spark was also placed in the centre of the spark picture.
Loading Source Images in the GAP-Frames
Figure 1
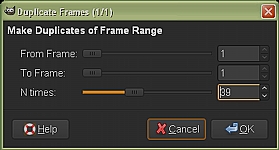
The GAP cannot process other files but those with the specific . xcf extension, and the frames must end with ... 000001.xcf .... .... 000nnn.xcf. The other source images can also have .xcf extensions. Since the background of the GIF-movie will be spiral_background.xcf, make a copy of it under Image --> Duplicate, and give the name spiral_000001.xcf to the copy that pops up as "Untitled". Any further action should be started from this, and this will be the first video frame as well. First, make 39 copies of it to get 40 frames in total. GAP plug-in is inserted in the GIMP menu bar by the name "Video". In its drop-down menu, select Duplicate Frames.
Now we have only one frame, so this function automatically offers the range From Frame 1 To Frame 1. We can duplicate it N times. If this is set to 39, the program produces an additional 39 copies of the first frame and give them the filenames spiral_000002.xcf .... to spiral_000040.xcf. After entering 39, click OK, and wait until the GIMP completes the task.
The following layer to insert is the image spiral.xcf. The GAP can only work with images that are open, so open this image. We may as well have them all opened, but then we must be sure to choose the one which we want to process.
Figure 2
Starting from Video in the menu-bar of spiral_000001.xcf, select Move Path, the function with which images can be added to the GAP-frames. When the Move Path window appears on the screen, the Source Select tab is active at top left. We find below the Source Image/Layer drop-down menu where we can see our image(s). Select spiral.xcf from the drop-down menu, unless it is already chosen, as shown in the illustration. From the Stepmode menu select None. Under the Preview window you can see "Instant Apply" accompanied with a small checkbox. Check it, and spiral.xcf will appear in the window.
Now look at the upper-right corner of Move Path dialog: for Mode Normal is defined, and it needn't be changed. For the alignment (Handle) Top and Left is set, and we can leave it unchanged.
Next, to the bottom right, we can see that the program wants to insert our blue spiral from the first frame to the fortieth (From 1 To Frame 40), and this is what we want, too, so leave it alone. This image will be put in the layer numbered 0 in the layerstack, which is the uppermost layer of each frame. That is good, so leave the Layerstack at 0. We need not toil with other settings, but press Add Point button, that is the first one from the group of buttons placed under " Edit Controlpoints". By this, we tell GIMP to place the blue spiral into the 0. layer of the first frame just in the way we can see it in the preview. We want to repeat this with all the other 39 frames left, but for this, we should not press Add Point again (and DO NOT DO!), but click OK, because this will mean that we want all the frames to be the same from the first one to the 40th. Wait until the GIMP finishes.
We have two source images left, that we want to move along the trace of the blue spiral, in the full framerange. It is easy, because GAP is able to move a picture along a path. The only thing to do is to create a path in the first frame, i.e. spiral_000001.xcf.
Figure 3
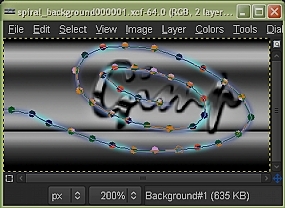
If you have a small image, then first magnify the frame, e.g. to 200% and then press "b" keyboard shortcut to turn on Paths. Put up 40 control points along the spiral, starting from the position that you mark out to be the beginning of the motion, then going on to the last point which will be the ending. I started at the left edge, then moved to the right, all along the coil. You must have 40 points, one for each frame. If you don't succeed in placing the points evenly at first, you can edit them afterwards: the nodes of the path can be displaced by clicking on them and dragging, or new points can be added after switching over to Edit in the Paths dialog. When you're ready, save spiral_background000001.xcf. To hide path simply press "p" (Brush) shortcut key.
Figure 4
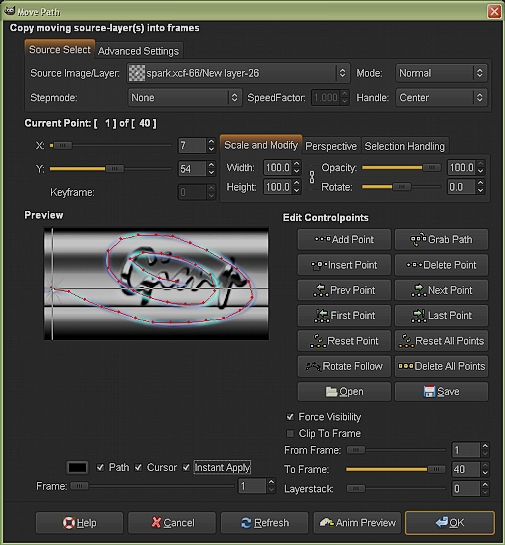
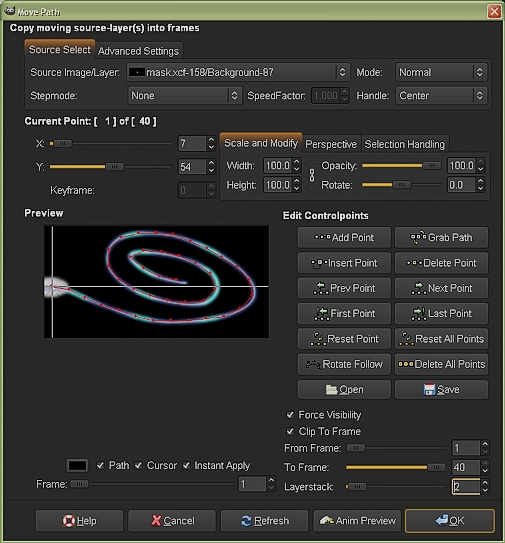
Once again select Move Path from the Video menu of the first frame. From the Source Image/Layer drop-down menu select spark.xcf. Stepmode will be None again, instead of the default Loop, the Mode is left Normal, but for Handling choose Center, because GAP will pull then the centre of the source image (this is now where the spark is placed) on the path nodes.
Once again, check out the small checkbox belonging to Instant Apply under Preview window. Frame selection From 1 to 40 and Layerstack position offered by GAP (bottom right) will do again. However, to Edit Controlpoints press the Shift key on your keyboard together with Grab Path button (right to the Add Point button) in Move Path window.
Soon you'll see the path in the Preview window, and the program drags the spark on the 1st node of the path. (You can check it up if you look at the x-and y-coordinate values: they are automatically set to x=7 and y=54.)
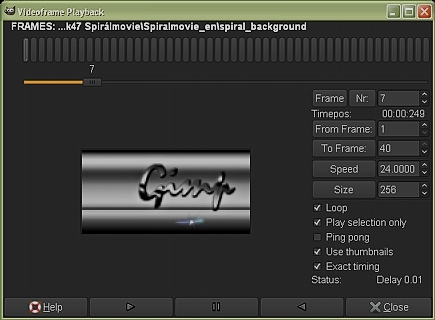
Before clicking OK, let's see if the data we entered does exactly what we want or not. In the lowest row of buttons of Move Path window, you can see Anim Preview button. By pressing, the GAP creates a multilayer image from the separate frames, a motion picture that you can play back and watch the results of your settings.
Figure 5
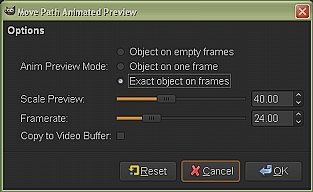
There are three ways to watch the result, but now the best is if we check the new layer against the others, i.e. we compare the track of the spark with the spiral. This can be achieved by selecting "Exact object on frames" option. We don't have to pay regard to the other parameters, but click OK, and wait patiently until the GIMP assembles the frames (it takes a little time), then throws up the image named "Untitled", accompanied with a playback window (Fig. 6). In the latter, click on the Play button, to watch the movie that is now played with a default 41ms delay time. If it runs too fast, slow it down, choosing a smaller speed from the drop-down menu placed bottom left of the window (e.g .50% or 25 %).
Figure 6
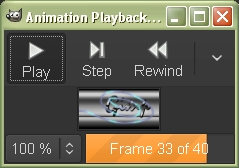
You can even watch the movie step by step, pressing the Step button. If you have set the parameters well previously in the Move Path window, then the spark runs over the spiral and disappears somewhere above the text. Close the Playback window and the Untitled image, too (without saving it, because it will not be needed), and if you are satisfied with the result, then press OK in the Move Path window, (now you need not click Add Point).
But if you have seen some trouble, then click "Cancel" button at bottom left, then start again and correct the errors.
Figure 7
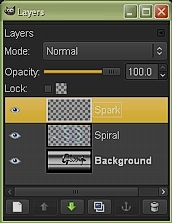
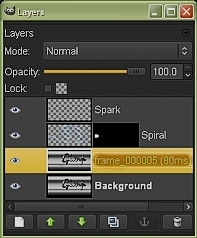
If you have not opened the Layers dialog yet, it is high time to do. (For fear of mistakes, it is recommended to keep this dialog open while working with GAP.) Sure, you can only see the point if spiral_000001.xcf is active, and not one of the other pictures that are still open. The figure to the left shows the background layer below with the text "GIMP", on the top of it the blue spiral and uppermost, in layer 0 lies the spark, although it is so small that is invisible, but still it's there (upon my honour).
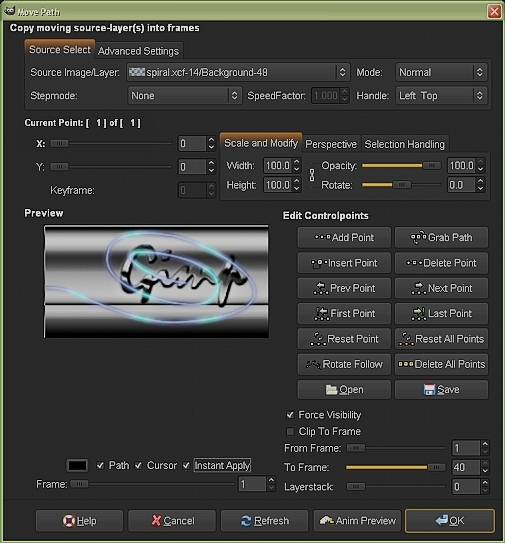
Now let's use Move Path (Figure 8) for the third time (Video menu), but now for entering the mask. From the drop-down menu of Source Image/Layer select mask.xcf. Set the Stepmode again to None, the Mode to Normal, and similarly to the spark, choose again Center for Handle to drag the white oval shape on the path nodes. That is why it was very important to place the white patch in the centre of the mask picture. This image is twice the size (400x200 pixels) of the final GIF-movie, so it is easy to move in any direction: it will still completely cover the entire field.
Figure 8
Check again Instant Apply under Preview window, and you will see the black mask. Again, we will apply the operation to the whole range of frames (from Frame 1 to Frame 40), but in contrast to the already familiar steps, now we are going to change two parameters. We should crop the mask image to the size of the frames, because without doing so, the alignment could be uncertain, that can be told about every kind of picture that is bigger than GAP-frame size. To this end, check the box belonging to Clip to Frame. Below, set Layerstack number to 2 instead of the default 0. After inserting, we will use the mask picture for masking the blue spiral in a second step, but for this we have to include it first as a common layer. There are two ways to add layermask to a layer: from the layer above or from the layer below. At present, layerstack number of the blue spiral to be masked is 1. If we put mask.xcf into layer 1, it would automatically push the blue spiral into the 2nd layer. We could copy the mask from the layer above, but in this case we could not see the spiral in the Move Path Preview, because mask picture would cover it. If, however, we placed mask.xcf into layer No. 2, the spiral would be visible, and copying as layermask would equally be feasible. So set Layerstack to 2.
Well, there is not much left but to hold Shift and click again Grab Path button, and after some seconds path will appear again, and we can see that the white oval shape is drawn onto the first node of the path. We can click OK (or can make Anim Preview as described above) or after cancelling the operation we can set new data if during Anim Preview something did not earn our approval.
Manipulation of Layers
Figures 9-10.
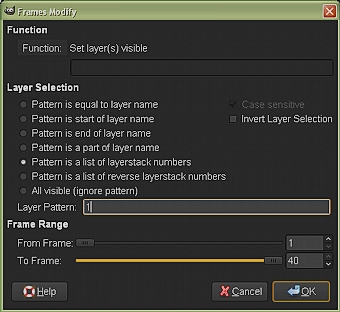
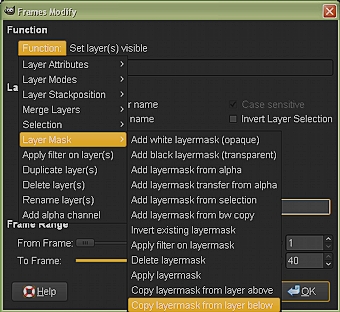
First we have to mask the blue spiral. Under Video menu, select Frames Modify feature. Figs. 9-10 show the dialog of this function. In the left one, you can see where to select the layer to be modified. In the middle of the window you can see Layer Pattern. The corresponding input field is displayed first with the default 0. We want to mask the layer No. 1, so rewrite the 0 with 1. The remaining data may be left unchanged. To the right, Figure 10 still shows the same window, but now, after setting the layerstack number of the layer to be modified, we click on the Function that is shown in orange (in my GIMP-skin). To this, a drop-down menu is shown from which Layer Mask interests us. In the latter's menu we'll find "Copy layermask from layer below" line. This is the 2nd numbered layer where we put mask picture. Click on this line, then OK in the bottom right corner of Frames Modify window and wait until the operations are carried out by the GIMP.
Figure 11
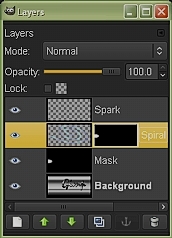
Let's look at what we can see in the Layers window. The topmost layer 0 is the spark. Below, layer 1 is the blue spiral, to which the mask was copied, cropped to size (clipped to Frame). Under the masked layer we can see the mask picture left there and at the bottom we find the Background metal plate with the inscription GIMP. The layer No. 2 that has been used for masking should be deleted from all the frames.
Figure 12
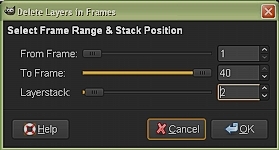
Choose Frames Layer Delete function from the menu of Video, which can be used to delete a selected group of layers from the frames. Now, all the 40 frames should be relieved from the masking picture that lies in the 2nd layer. So you can accept the setting From Frame 1 to Frame 40 offered, but you should choose 2 from the layerstack numbers, instead of 0. Finally, click OK.
The first part of the work was actually finished, so let's see what we did.
Figure 13
Click Playback from drop-down menu of Video. The replay function calculates upon the whole set of frames (1-40) and we can leave it there. The Loop mode to display is also good, because the final GIF-image will also be manifested in this way. All the other parameter values are good for us, so click on the replay (second button from left) in the bottom row, and you'll see the model, in which, due to the mask, a single blue lightbeam runs along the spiral route, with a spark in the middle. The result is excellent, so you can Close the movie.
The result is not bad, but it would be much more exciting if there were two lightbeams, one chasing the other. The easiest way would be to duplicate the blue spiral and the spark, then loop the whole set and push some frames forward or backward (shift layer). I haven't find a feature like this in GAP. There is Frame Shift, Loop, but there is no layer shift (unless something escaped my attention).
Figure 14
Armed with a healthy amount of laziness (of which I have enough) we can apply "more with reason than with force" principle. If we prepared a helper.xcf image of 40 frames from the semi-finished frames, we could reintegrate this helper picture into the frames with Move Path, using Loop function.
Let's see how it works in practice.
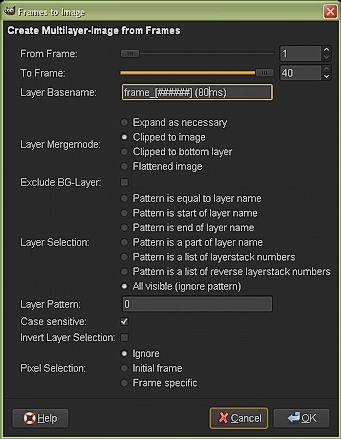
The first step is to unite the existing frames in a picture with the Video|Frames to Image function. The default settings of the "Frames to Image" window are satisfactory, except for one: instead of the 41ms delay time let's try an experimental 80 ms (from the past replays and playback we could get some hint about the final running speed to be set in order to get best results. I found the default 41 ms too fast, so this time I tried 80 ms). The time can be entered in the Layer Basename input field (the original 41 ms can simply be overwritten). Then click OK, and wait until the GIMP creates the picture that shows up as Untitled.
Save this as for example helper.xcf in the same Spiralmovie folder, which has been created especially for this work, and leave it open. The other source images (spark, spiral, and mask) can now be closed to clear the screen a little. Check the running speed of helper.xcf to see if an 80-ms delay time is acceptable. From the menu bar of helper.xcf call Filters --> Animation --> Playback. You can see that an 80-ms delay time may be, to some taste, too slow. Now we can draw the conclusion: the picture is too fast at 41 ms, and too slow at 80 ms. The final speed should be set between these two values.
Figure 15
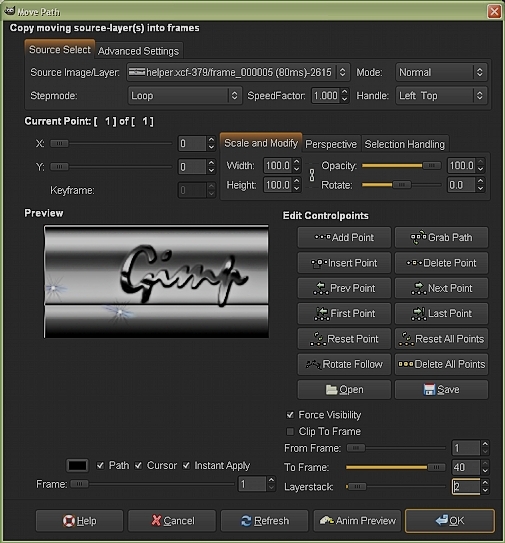
Now, once again, but for the last time select Move Path from the Video menu. Leave Stepmode at Loop, and alignment at the default Top Left, set Layerstack number to 2 to put helper frames just above the Background layer of the frames, so that the spiral and spark could still be seen. The integration should span from Frame 1 to Frame 40. Check out Instant Apply. There is but one last task to do: from the Source Image/Layer drop-down menu select the frame of helper.xcf which you want to see on the first frame of the future GAP-image. I chose 5th frame of helper.xcf. If you click on the drop-down menu, you can see that all the 40 frames of the helper.xcf are there, you may start with any of them. If 5th is selected, then the light blue strip appears right in front of uppercase G of Gimp. If you stick to this, then 5th frame of helper.xcf will be inserted into spiral_000001.xcf, 6th frame of helper will be put in spiral_000002.xcf, .....40th frame of helper will be included in spiral_000036.xcf, and due to Loop stepmode, 1st frame of helper will appear in spiral_000037.xcf, ...., finally, 4th frame of helper.xcf will be inserted into spiral_000040.xcf. Put simply, the blue and sparking lightbeam will be repeated once again in the final GIF-movie, shifted 5 frames forward.
Thus, it seems as if two lightbeams chased each other. And by this, "Layer shift" problem has also been solved. Now press the Add Point button in Move Path window. If you want to have a look at the future image, apply Anim Preview (see Figs 4 and 5). If you are satisfied, then click OK in Move Path window.
Figure 16
Let's take a last look at the Layers dialog: the helper image is noticeably there, in the 2nd layer. We now only need to create the GIF-image, and save it in GIF format. Call again Video|Frames to Image function for converting the frames (see Fig. 14), but now enter 60 ms delay time instead of 80, and press OK. Wait until GIMP makes the image and throws it up on the monitor as an untitled picture.
If you don't want the GIF-picture to be too large (and why would you want to?), than pick out the unnecessary duplications with optimization. This function can be found in the Filters menu of the new untitled picture, under Animation: Optimize (for GIF). Run the function and then GIMP makes a second untitled picture, that, in turn, is optimized. (The first untitled image can now be closed without saving.) Select Save from the File menu of the second, optimized untitled image and enter a name you like with .gif extension. The example image at the top of this page were given the name spiralmovie_en.gif. To save, first it should be exported, because it consists of 40 frames. The window for exporting pops up automatically (Figure 17).
Figure 17
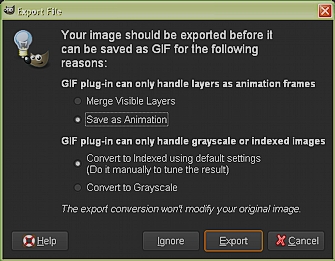
It is very important to check "Save as Animation" instead of the default "Merge Visible Layers". Press the Export button.
Another and last window will appear (Fig. 18).
Figure 18
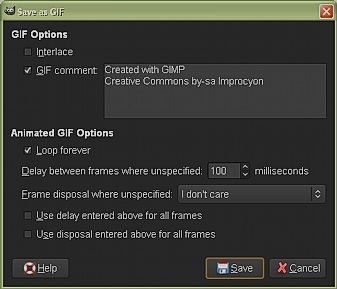
Each necessary parameter is checked by default, so we don't have to do anything else but click Save, with the joy of a work well done, heaving a sigh of relief. (You can complete the GIF comment section, as I did, if you want to.)
Correcting Errors, Editing
All of us may have the experience of mismanaging something. In this case, we might start from the beginning, but it takes less effort and time to correct the mistake.
One method is certainly familiar by this time: we can simply delete the corrupted layers from the frames with the Frames Layer Delete function, and then we can reinsert the source image (even after redrawing it) again.
Layermask can also be deleted. In Frames Modify function, you can input the number of Layer Pattern and from the menu of Layer Mask you can choose Delete layermask that deletes the mask applied but keeps the layer itself.
It may also happen that we inadvertently assign an image to an incorrect layerstack number. This can be corrected by making the layer in question step up or down in the layerstack with the Frames Modify function (Figure 19).
Figure 19

Frames Modify is already known. If you click on Function, a drop-down menu appears and reveals Layer Stackposition. By mousing over this line you get another menu with two options: Raise layer(s) or Lower layer(s). The downward or upward shift should be understood according to what we see in the Layers dialog: stepping up means the reduction of the layerstack number of the layer in question by one, stepping down, in turn, means increasing the number by one. The operation will affect the layer specified in Layer Pattern's input field.
Figure 20
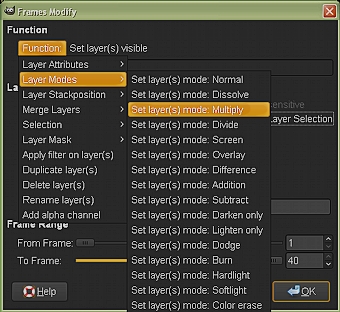
Sometimes, as a last resort, we may change layer Mode. For this, we should appeal again to the friendly Frames Modify function, where we can specify the Layer Pattern, and then choose some other mode (e.g. Multiply, Hardlight etc.) instead of Normal.
If you have any question feel free to contact me.
For making the above GIF-movie I used GIMP for Windows v2.4.2 by the courtesy of sourceforge.net and GAP v2.2.2 Plug-in compiled by JamesH.
Kezdőlap | GIMP tutorialok 1. | GIMP tutorialok 2. | Inkscape tutorialok | Képsorozatok | Honlaptérkép | Pihentetőül | Kapcsolat | Lap tetejére
Ahol másként nincs jelezve, a honlap tartalma a Creative Commons Nevezd meg!-Így add tovább! 3.0 Licenc feltételei szerint használható fel.
Szerző: Improcyon